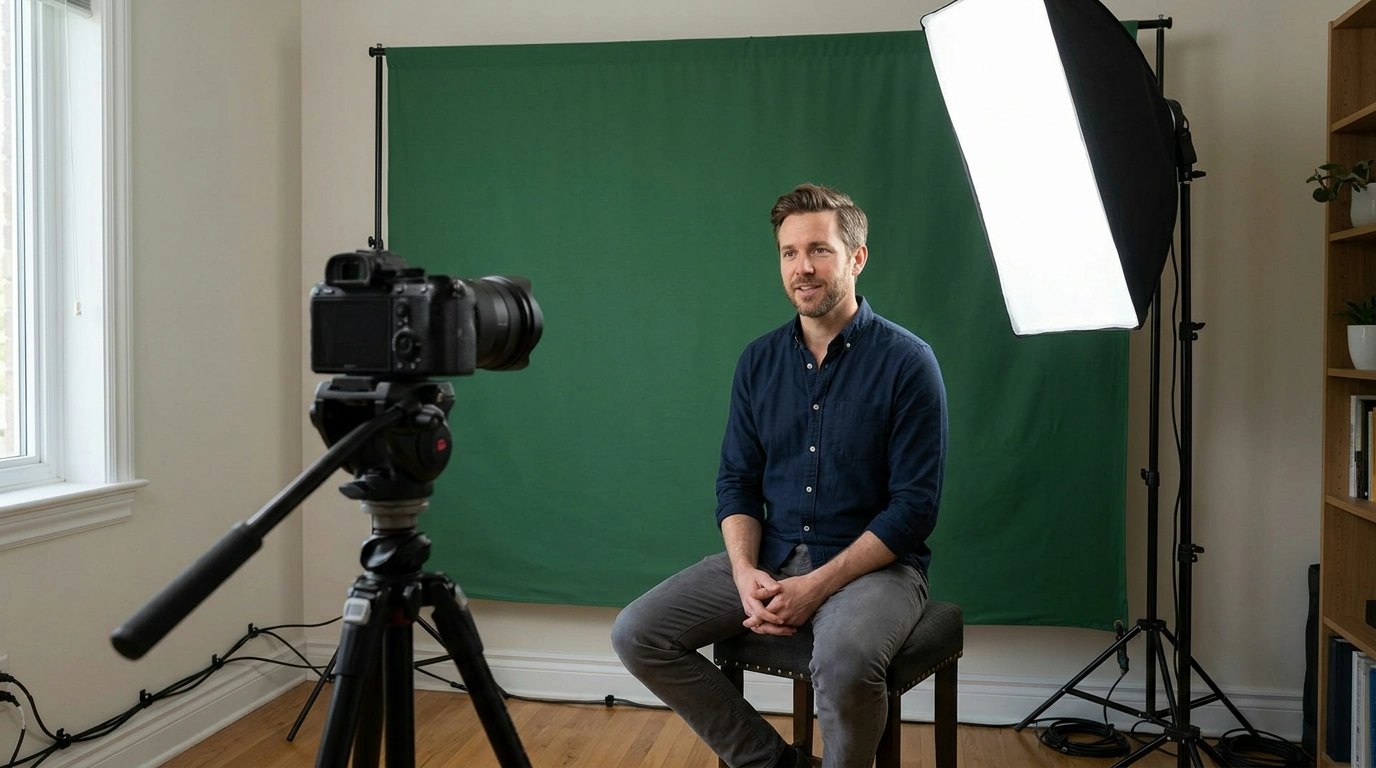
A dedicated place to film or photograph can make each session easier to start. Our 20W Studio Lighting Kit brings together a softbox, tripod, and green screen backdrop for creators who want a straightforward small-studio setup. You can use the same basic arrangement for a talking-head video, a product demonstration, or a short portrait clip, then make a few adjustments to suit each project. For more guidance, see Lighting | University Libraries.
The softbox spreads light across a broader area than a bare light source, which can give your subject gentler-looking illumination. Its position matters as much as the light itself: moving it to the side changes where shadows fall, while changing its angle can affect glare on a product or glasses. For further reading, see Light Box Photography Lighting Kit:37″ Octa Softbox, ….
The included tripod helps you position the lighting equipment consistently. Once you find a placement you like, you can return to roughly the same setup next time. Treat it as part of the lighting setup rather than assuming it is a tripod for your camera.
The green screen gives you a backdrop for footage or photos you plan to edit. It does not replace a background on its own; you will need suitable editing software for that step. If you are ready to put these pieces together, explore our 20W Studio Lighting Kit with Softbox, Tripod, and Green Screen Backdrop.
Start by choosing a spot where your subject can stand or sit away from the green screen. That gap can help keep the subject’s shadow off the backdrop and limit green light reflecting onto skin, clothing, or products. Leave room for the tripod, too, without putting its legs in a walkway.
Smooth the screen as much as practical, then look through your camera rather than judging the backdrop from across the room. Check whether its edges, nearby furniture, or other clutter appear in the frame. You may be able to solve a framing problem by moving the camera or subject before rearranging the entire space.
Place the softbox slightly to one side of your subject as a starting point. Watch the camera view as you adjust its angle, especially around facial shadows, reflective packaging, and shiny surfaces. Set the tripod on a stable surface, make sure it is secure, and route cables where feet and chair legs will not catch them.
There is no single placement that suits every room. Available space, ambient light, camera framing, and the look you want will all affect where the light and backdrop work best. Use these arrangements as starting points, then judge the recorded image.
| Project | Lighting starting point | Backdrop consideration |
|---|---|---|
| Talking-head video | Position the softbox just off to one side of the camera and adjust for comfortable-looking light on your face. | Leave space between the speaker and green screen to help reduce backdrop shadows. |
| Product demonstration | Aim the softbox toward your hands and product, then check the camera view for glare. | Keep objects out of the background if they would complicate editing. |
| Portrait or short clip | Move the light gradually to see how its angle changes facial shadows. | Smooth the screen and keep the subject within its visible area. |
For a demonstration, make a few practice motions while watching the frame. Your hands or the product may move into shadows that were not obvious when everything was still. For a talking-head recording, sit or stand where you intend to speak; checking the light from your actual position is more useful than checking an empty set.
Background replacement is easier when the green area looks reasonably even in the recorded image. Before a full session, inspect the camera view for wrinkles, strong shadows, and darker patches. Also look for green reflections along the edges of your subject and avoid clothing that blends into the screen.
Record a short test clip and try it in your editing software. That gives you a chance to catch problems while the setup is still in place. If the replacement looks uneven, change one thing and test again: smooth a wrinkle, increase the distance from the backdrop, or adjust the light’s angle. Adobe’s guide to using a green screen offers more detail on the editing side of the process.
You can also use the screen as a plain green backdrop when replacement is not part of the project. Either way, what you see in the camera frame is the best guide to whether the space is ready.
When the image needs improvement, change one variable at a time: the light angle, the subject’s distance from the backdrop, or the framing. Comparing short recordings makes it easier to tell which adjustment helped. For videos where you also want to review recorded sound closely, our High-Fidelity 9.2mm Beryllium-Coated Single Driver In-Ear Headphones are an option to explore alongside your lighting setup; they are not part of the kit.
Replacing a green background generally requires photo or video editing software with a chroma-key or background-removal tool. You can also use the screen as a plain backdrop without replacing it.
Start slightly to one side of the camera, aimed at your face. Check the image and adjust the position to reduce unwanted shadows or glare.
Separation can help limit shadows on the backdrop and reduce green color reflecting onto the subject, making background replacement easier.




Leave a comment